
LV030-从0搭建一个manifest清单库
为什么是叫笔记要叫搭建一个清单库呢?其实我们通过 repo 管理多个 git 项目的时候,主要就是编写清单文件:xxx.xml
一、概要
前面我们已经知道了,repo 是 git 仓库的管理工具,它能更方便的管理由若干个 git 仓库组成的项目。它是 Python 脚本,平常我们操作的 repo 命令只是一个入口,其实它还有一个 git 仓库,是一系列 Python 脚本的集合。
repo 通过清单文件(.xml)来管理。清单文件里记录了所有的 git 仓库信息。也可以当作是项目的快照,根据某一个清单文件,就能将整个项目里的所有 git 仓库都还原到生成清单文件时的状态。所有的清单需要一个 git 仓库管理。
所需要的东西和教程,可以参考这两个地方:
二、准备工作
1. repo 工具安装
这个在前面已经安装过了。
2. repo 源码
repo 的源码:不仅仅是 repo 命令那一个脚本,而是 repo 的源码库,源码库中也会有 repo 命令。前面我们知道在进行 repo init 的时候是要进行 repo 源码的下载的,一般来讲,默认是从官方网站:https://gerrit.googlesource.com/git-repo,但是这里呢,我们可能会遇到一些网络问题,可以有两种办法。
2.1 使用清华源
参考文档在这里:AOSP | 镜像站使用帮助 | 清华大学开源软件镜像站 | Tsinghua Open Source Mirror,然后我们可以按照说明,一步一步操作。这个方式的话需要修改一下环境变量,但是其实命令改一下也行,不过还是改环境变量吧,方便一点:
echo "export REPO_URL='https://mirrors.tuna.tsinghua.edu.cn/git/git-repo'" >> ~/.bashrc
source ~/.bashrc分析源码就可以知道,当不指定地址的时候,默认就是使用的 REPO_URL 这个环境变量的地址:
pythonREPO_URL = os.environ.get("REPO_URL", None) if not REPO_URL: REPO_URL = "https://gerrit.googlesource.com/git-repo" REPO_REV = os.environ.get("REPO_REV")
2.2 fork 源码
这种方式当然就是在自己的 github 或者 gitee 中创建一个源码仓库就行了,可以从这里 fork:GerritCodeReview/git-repo。
说明:我没用这个,这个毕竟还是 github,有时候也访问不了,我后面用的都是清华源的了。
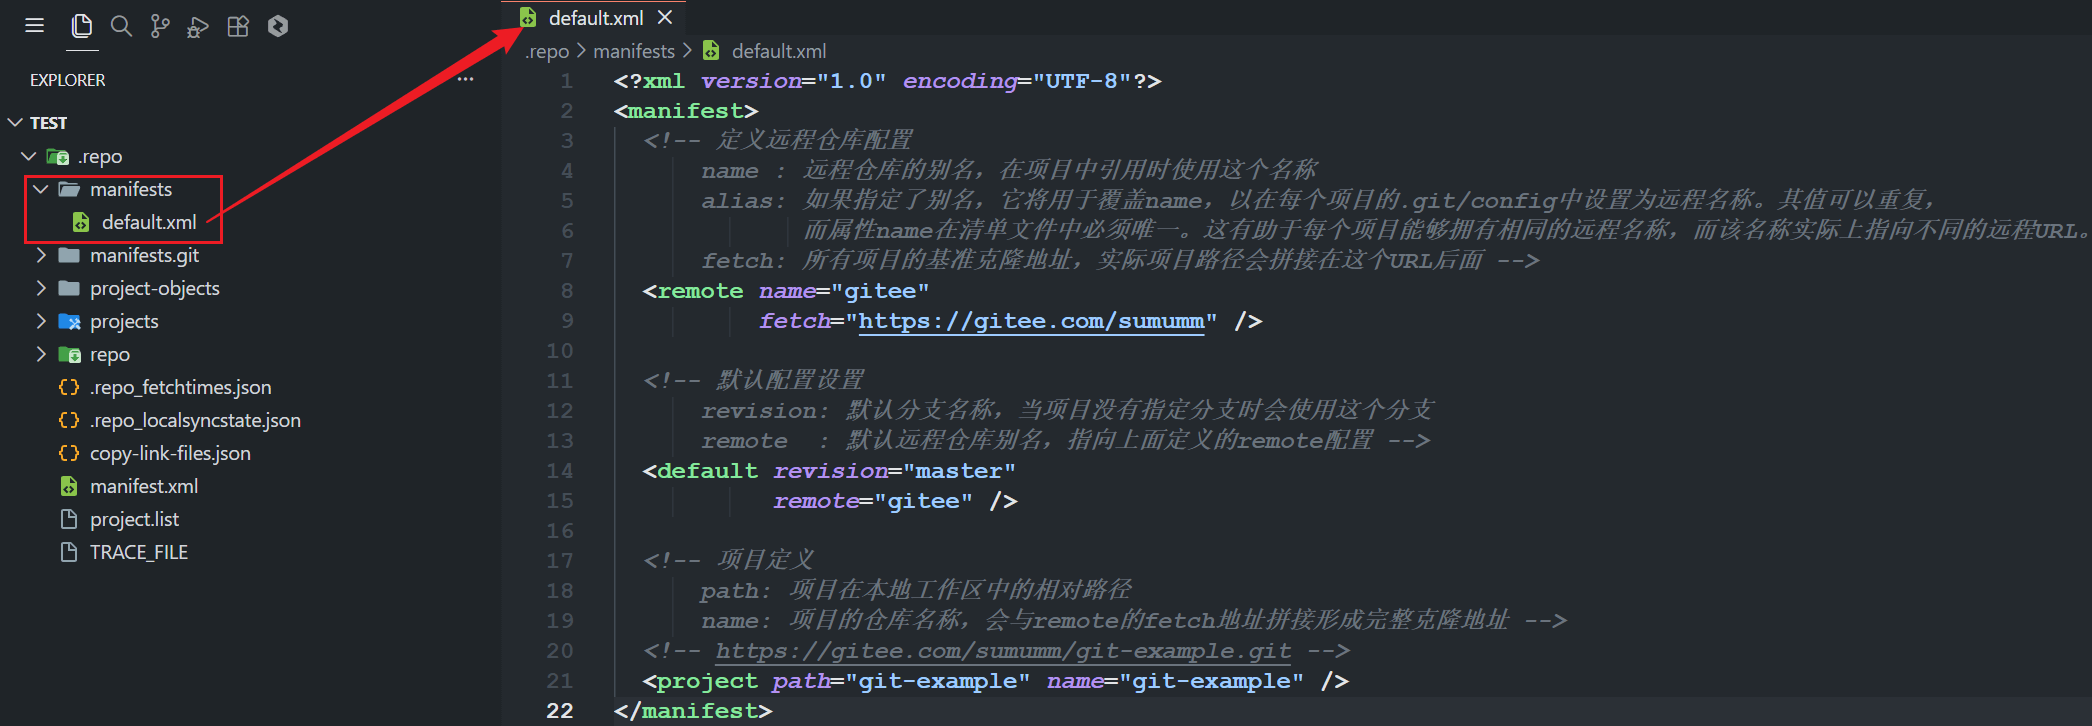
3. 清单库
自己建一个叫 manifest 名字的 git 库,用来存放清单文件就可以。注意,必须至少有一个清单文件,这样才能根据清单文件拉取代码,之后也才能生成新的清单文件。我们新建一个 default.xml 文件,并添加以下内容:
<?xml version="1.0" encoding="UTF-8"?>
<manifest>
  <!-- 定义远程仓库配置
      name : 远程仓库的别名,在项目中引用时使用这个名称
      alias: 如果指定了别名,它将用于覆盖name,以在每个项目的.git/config中设置为远程名称。其值可以重复,
             而属性name在清单文件中必须唯一。这有助于每个项目能够拥有相同的远程名称,而该名称实际上指向不同的远程URL。
      fetch: 所有项目的基准克隆地址,实际项目路径会拼接在这个URL后面 -->
  <remote name="gitee"
          fetch="https://gitee.com/sumumm" />

  <!-- 默认配置设置
      revision: 默认分支名称,当项目没有指定分支时会使用这个分支
      remote  : 默认远程仓库别名,指向上面定义的remote配置 -->
  <default revision="master"
           remote="gitee" />

  <!-- 项目定义
      path: 项目在本地工作区中的相对路径
      name: 项目的仓库名称,会与remote的fetch地址拼接形成完整克隆地址 -->
  <!-- https://gitee.com/sumumm/git-example.git -->
  <project path="git-example" name="git-example" />
</manifest>三、相关命令
1. repo init
1.1 命令说明
repo init -u <URL> [<OPTIONS>]-u:指定 manifests 这个远程 git 库的 URL,manifests 库是整个项目的清单。默认情况,这个 git 库只包含了 default.xml 一个文件,其内容可以参见 Android 的样本
-m, –manifest-name:指定所需要的 manifests 库中的清单文件。默认情况下,会使用 maniftests/default.xml
-b, –manifest-branch:指定 manifest.xml 文件中的一个版本,,也就是俗称的“分支”
还有这几个参数可能也会用到:
repo Version options:
    --repo-url=URL      repo repository location ($REPO_URL)
    --repo-rev=REV      repo branch or revision ($REPO_REV)
--no-repo-verify do not verify repo source code- –-repo-url:指定远程 repo 库的 URL,默认情况是 https://gerrit.googlesource.com/git-repo,但国内访问 Google 受限,会导致这个库无法下载,从而导致 repo init 失败,所以可以通过该参数指定一个访问不受限的 repo 地址。
- --repo-rev:同 manifest 这个 git 库一样,repo 这个 git 库也是有版本差异的,可以通过该参数来指定下载 repo 这个远程 git 库的特定分支。
- --no-repo-verify:在下载 repo 库时,会对 repo 的源码进行检查。通过–repo-url 指定第三方 repo 库时,可能会导致检查不通过,所以可以配套使用该参数,强制不进行检查。
运行该命令后,会在当前目录下新建一个.repo 子目录:
.repo
├── manifests     # 一个 git 库,包含 default.xml 文件,用于描述 repo 所管理的 git 库的信息
├── manifests.git # manifest 这个 git 库的实体,manifest/.git 目录下的所有文件都会链接到该目录
├── manifest.xml  # manifests/default.xml 的一个软链接
└── repo # 一个 git 库,包含 repo 运行的所有脚本1.2 命令参考
这些本地的目录是如何生成的呢?执行 repo 命令时,可以通过 -–trace 参数,来看实际发生了什么。
repo --trace init -u $URL -b $BRANCH -m $MANIFEST有的时候我们忘记设置 git-repo 源码位置的话,就会从默认地址下载源码,但是这又需要科学上网,就导致会失败,所以我们可以按照 git-repo | 镜像站使用帮助 | 清华大学开源软件镜像站 | Tsinghua Open Source Mirror 这里说的,修改环境变量,当然也可不修改,我们可以使用上面的两个参数:
repo init --repo-url=<git-repo SRC_URL> --repo-rev=<git-repo SRC_BRANCH> -u <URL> [<OPTIONS>]注意:这里的两个 URL 都用 http 地址吧,不然好像会报错。
【参考命令】
repo --trace init --repo-url=https://mirrors.tuna.tsinghua.edu.cn/git/git-repo --repo-rev= -u https://gitee.com/xxx/manifest.git -b master -m xxx.xml【注意】使用自定义 git-repo 源码仓库的时候可能会出现无法访问的情况,比如要是 github 上的仓库,有时候无法访问,就可能会出现报错。
1.3 使用实例
上面我们已经设置完了环境变量,然后我的 manifest 目录是:
https://gitee.com/sumumm/manifest.git # 为了防止输入账号密码,我后面用的是 SSH 链接初始化的命令如下:
repo init https://gitee.com/sumumm/manifest.git -m default.xml

# 加上 --trace 参数会显示更加详细的过程
repo --trace init https://gitee.com/sumumm/manifest.git -m default.xml会看到有如下打印信息:
➜  test repo --trace init https://gitee.com/sumumm/manifest.git -m default.xml
: git --version
Downloading Repo source from https://gerrit.googlesource.com/git-repo
: git init --quiet
: git config remote.origin.url https://gerrit.googlesource.com/git-repo
: git config remote.origin.fetch '+refs/heads/*:refs/remotes/origin/*'
: git config --get-regexp 'url.*.insteadof'
: git fetch --quiet /root/test/.repo/repo.tmp/.git/clone.bundle '+refs/heads/*:refs/remotes/origin/*' '+refs/tags/*:refs/tags/*'
: git fetch --quiet --progress origin '+refs/heads/*:refs/remotes/origin/*' '+refs/tags/*:refs/tags/*'
repo: Updating release signing keys to keyset ver 2.3
warning: gpg (GnuPG) is not available.
warning: Installing it is strongly encouraged.

: git rev-parse --verify 'refs/remotes/origin/stable^{commit}'
: git update-ref refs/heads/default 871e4c7ed153682a77de44e300b5f5461eb08538
: git config branch.default.remote origin
: git config branch.default.merge refs/heads/stable
: git symbolic-ref HEAD refs/heads/default
: git read-tree --reset -u -v HEAD
: git --version
: /usr/local/bin/python3 /root/test/.repo/repo/main.py --repo-dir=/root/test/.repo --wrapper-version=2.61 --wrapper-path=/root/02software/repo_bin/repo -- --trace init https://gitee.com/sumumm/manifest.git -m default.xml(1)在当前目录下创建.repo 子目录,后续所有的操作都在 .repo 子目录下完成;
(2)clone 了两个 git 库,其中一个是 -u 参数指定的 manifests,本地 git 库的名称是 manifest.git; 另一个是默认的 repo,后面我们会看到这个 URL 也可以通过参数来指定;
(3)创建了 manifest/.git 目录,里面的所有文件都是到 manifests.git 这个目录的链接,这个是为了方便对 manifests 目录执行 git 命令;
(4)将 manifest 切换到 -b 参数指定的分支;
(5)在 .repo 目录下,创建了一个软链接,链接到 -m 参数制定的清单文件,默认情况是 manifests/default.xml。
这样,就完成了一个多 git 库的初始化,之后,就可以执行其他的 repo 命令了。
1.4 目录结构
这个时候,我们得到的目录结构如下:
会发现这里会有我们的清单库仓库中的 default.xml。
1.5 指定清单文件名
其实这里也不一定非要用 default.xml,由于这个清单库的名字是固定的,我们不可能用这一个清单库只管理一个项目吧,那岂不是很浪费。前面我们知道这里是可以指定使用的 xml 文件的,所以我们可以修改清单库中默认 xml 文件名称为 repo-demo.xml 然后我们可以通过以下命令来创建一个项目:
repo --trace init --repo-url=https://gitee.com/sumumm/git-repo.git --repo-rev=main -u https://gitee.com/sumumm/manifest.git -b master -m repo-demo.xml其实自己也没必要搞这么一个仓库,用清华源的那个就好啦:
repo --trace init --repo-url=https://mirrors.tuna.tsinghua.edu.cn/git/git-repo --repo-rev= -u https://gitee.com/sumumm/manifest.git -b master -m repo-demo.xml这样也很快,这个不指定 git-repo 源码仓库分支也可以,就用默认的。所以这样修改 xml 名字后也完成了 repo 项目的初始化。
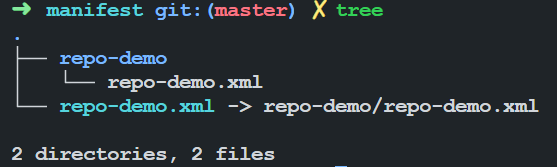
1.6 指定清单库路径
我们能不能把 xml 放到其他文件夹中?我们来试一下:
repo --trace init --repo-url=https://mirrors.tuna.tsinghua.edu.cn/git/git-repo --repo-rev= -u https://gitee.com/sumumm/manifest.git -b master -m repo-demo/repo-demo.xml就会发现这样也是可以的:

我们还可尝试创建链接文件到仓库目录下,这样就不用输入路径了,我们来试一下:
# 在清单库创建软链接,这里不要在windows下尝试,windows下不支持软链接,可能会有问题
ln -s repo-demo/repo-demo.xml repo-demo.xml

# 重新初始化项目
repo --trace init --repo-url=https://mirrors.tuna.tsinghua.edu.cn/git/git-repo --repo-rev= -u https://gitee.com/sumumm/manifest.git -b master -m repo-demo.xml还是这个命令,但是仓库变成这个样子:
我们上传到 gitee 仓库,是这样的:

需要注意的是 windows 好像不太支持软链接,可能会有问题,我这个是在 ubuntu 中测试的。执行上面的命令后,也会创建成功。
1.7 指定清单库名
清单文件名可以自定义,那清单库名呢,应该也是可以的,我们可以修改清单库名称为:
repo --trace init --repo-url=https://mirrors.tuna.tsinghua.edu.cn/git/git-repo --repo-rev= -u https://gitee.com/sumumm/repo-manifest.git -b master -m repo-demo.xml尝试一下,就会发现也能正常创建 .repo 目录:
➜  test repo --trace init --repo-url=https://mirrors.tuna.tsinghua.edu.cn/git/git-repo --repo-rev= -u https://gitee.com/sumumm/repo-manifest.git -b master -m repo-demo.xml
: git --version
Downloading Repo source from https://mirrors.tuna.tsinghua.edu.cn/git/git-repo
: git init --quiet
: git config remote.origin.url https://mirrors.tuna.tsinghua.edu.cn/git/git-repo
: git config remote.origin.fetch '+refs/heads/*:refs/remotes/origin/*'
: git config --get-regexp 'url.*.insteadof'
remote: Enumerating objects: 9595, done.
remote: Counting objects: 100% (5559/5559), done.
remote: Compressing objects: 100% (2882/2882), done.
remote: Total 9595 (delta 5317), reused 2677 (delta 2677), pack-reused 4036
: git fetch --quiet --progress origin '+refs/heads/*:refs/remotes/origin/*' '+refs/tags/*:refs/tags/*'
repo: Updating release signing keys to keyset ver 2.3
warning: gpg (GnuPG) is not available.
warning: Installing it is strongly encouraged.

: git rev-parse --verify 'refs/remotes/origin/stable^{commit}'
: git update-ref refs/heads/default 871e4c7ed153682a77de44e300b5f5461eb08538
: git config branch.default.remote origin
: git config branch.default.merge refs/heads/stable
: git symbolic-ref HEAD refs/heads/default
: git read-tree --reset -u -v HEAD
: git --version
: /usr/local/bin/python3 /root/test/.repo/repo/main.py --repo-dir=/root/test/.repo --wrapper-version=2.61 --wrapper-path=/root/02software/repo_bin/repo -- --trace init --repo-url=https://mirrors.tuna.tsinghua.edu.cn/git/git-repo --repo-rev= -u https://gitee.com/sumumm/repo-manifest.git -b master -m repo-demo.xml2. repo sync
2.1 命令说明
repo sync [PROJECT_LIST]下载远程代码,并将本地代码更新到最新,这个过程称为“同步”。如果不使用任何参数,那么会对所有 repo 管理的进行同步操作。也可以 PROJECT_LIST 参数,指定若干要同步的 PROJECT。 根据本地 git 库代码不同,同步操作会有不同的行为:
(1)当本地的 git 库是第一次触发同步操作时,那么,该命令等价于 git clone,会将远程 git 库直接拷贝到本地。
(2)当本地已经触发过同步操作时,那么,该命令等价于 git remote update && git rebase origin/,就是当前与本地分支所关联的远程分支 代码合并可能会产生冲突,当冲突出现时,只需要解决完冲突,然后执行 git rebase --continue 即可。当 sync 命令正确执行完毕后,本地代码就同远程代码保持一致了。
在一些场景下,我们会用到 sync 命令的一些参数:
-j:开启多线程同步操作,这会加快 sync 命令的执行速度。默认情况下,使用 4 个线程并发进行 sync
-c, –current-branch:只同步指定的远程分支。默认情况下,sync 会同步所有的远程分支,当远程分支比较多的时候,下载的代码量就大。使用该参数,可以缩减下载时间,节省本地磁盘空间
-d, –detach:脱离当前的本地分支,切换到 manifest.xml 中设定的分支。在实际操作中,这个参数很有用,当我们第一次 sync 完代码后,往往会切换到 dev 分支进行开发。如果不带该参数使用 sync, 则会触发本地的 dev 分支与 manifest 设定的远程分支进行合并,这会很可能会导致 sync 失败。
-f, –force-broken:当有 git 库 sync 失败了,不中断整个同步操作,继续同步其他的 git 库。
2.2 使用实例
上面我们已经初始化好 repo 项目了,接下来我们同步一下:
repo sync # 加上 -j16 参数可以进行多核同步会看到有如下打印信息。
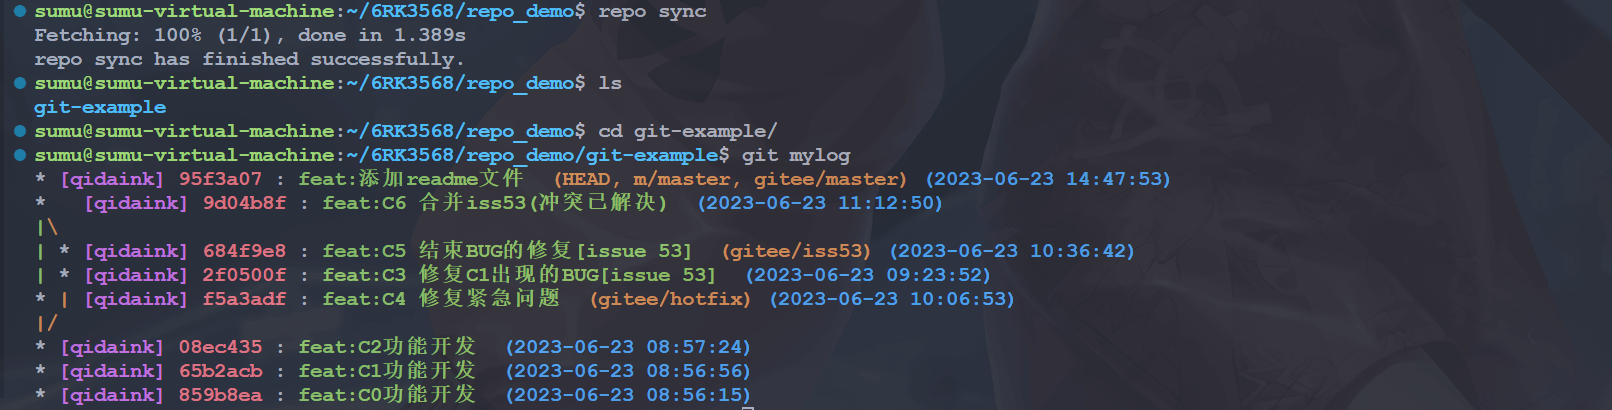
我们进到仓库中查看提交记录,会发现与原来的仓库一致。但是我们进入仓库查看一下现在在哪个分支,会看到如下内容:

会发现其实现在仓库是处于一个分离头指针状态,没有任何分支,我们可以手动使用 git switch -c branch_name 创建分支,但是当项目很多的时候就很繁琐了,我们继续向后看 repo start 命令。
3. repo start
3.1 命令说明
repo start <newbranchname> [--all | <project>...]命令用于在一个或多个项目中创建一个新的分支。它使得开发者能够方便地从当前的代码状态开始新的开发工作,尤其在处理多项目代码库时非常有用。
- newbranchname:是自定义的,它将追踪 manifest 中指定的分支名。
- project:指定了将参与此主题分支的项目。
- --all 表示所有的项目都开始新的分支。
repo start 是对 git checkout -b 命令的封装。这条指令与 git checkout -b 还是有很大的区别的,git checkout -b 是在当前所在的分支的基础上创建特性分支,而 repo start 是在清单文件中设定的分支的基础上创建特性分支。例如:repo start stable --all(所有项目)
假设清单文件中设定的分支是 gingerbread-stable,那么执行以上指令就是对所有项目,在 gingerbread-stable 的基础上创建特性分支 stable。
3.2 使用实例
repo start master --all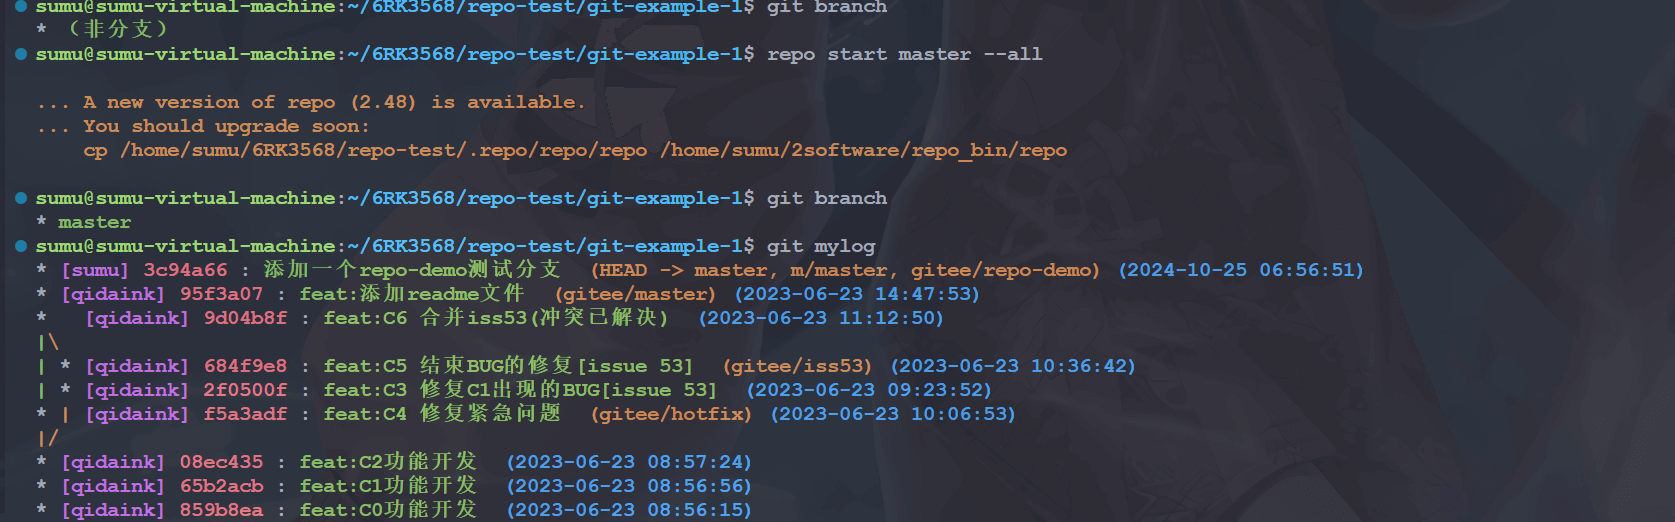
4. Repo + Gitee 本地开发流程
repo start {branch} --all # 切换开发分支,当对部分仓库进行指定时,会触发仓库的预先 fork
repo forall -c git add ./ git add / repo stage  # 批量加入暂存区或者单独加入
repo forall -c git commit / git commit  # 批量进行提交或者单独提交
repo config --global repo.token {TOKEN} # 进行 gitee access_token 配置, access_token 获取连接 https://gitee.com/profile/personal_access_tokens
repo config repo.pullrequest {True/False} # 对是否触发 PR 进行配置
repo push --br={BRANCH} --d={DEST_BRANCH}  # 进行推送并生成 PR 和审查,执行后会展示出可进行推送的项目,去掉注释的分支会进行后续推送
repo gitee-pr --br={BRANCH} # 获取项目推送后的指定分支的 PR 列表