
LV015-container模式
一、Container 模式拓扑
该模式 ≈bridge+host 的混合模式,指定一个容器以 bridge 方式启动,后面容器启动时指定网络模式为 container,它们自动共享第一个容器的网络资源。此时这两个容器共同使用同一网卡、主机名、IP 地址,容器间通讯可直接通过本地回环 lo 接口通讯。但这两个容器在其他的资源上,如文件系统、进程列表等还是隔离的。

二、有什么特点
(1)新创建的容器,仅同前面已存在的容器,共享网络空间,不与宿主机共享网络。
(2)新创建的容器,不会有自己的虚拟网卡和 IP,后面新创建容器的网络资源用的是上一个容器的。
(3)新创建的容器,仅仅是网络和第一个容器共享,其他资源彼此还都是相互隔离的。
弊端:第一个指定容器服务一旦停掉,后续的容器也没有办法继续运行
三、Container 模式示例
首先重开一个 CNB 开发环境,或者删掉之前运行的容器和镜像。
docker ps -a  #列出所有容器列表
docker rm -f $(docker ps -qa)  #强制移除所有容器
docker ps -a1. 未启动容器
1.1 宿主机网卡信息
ifconfig【例】
➜  /workspace git:(main) ifconfig
docker0: flags=4099<UP,BROADCAST,MULTICAST>  mtu 1500
        inet 172.17.0.1  netmask 255.255.0.0  broadcast 172.17.255.255
        ether 02:42:60:20:15:42  txqueuelen 0  (Ethernet)
        RX packets 0  bytes 0 (0.0 B)
        RX errors 0  dropped 0  overruns 0  frame 0
        TX packets 0  bytes 0 (0.0 B)
        TX errors 0  dropped 0 overruns 0  carrier 0  collisions 0

eth0: flags=4163<UP,BROADCAST,RUNNING,MULTICAST>  mtu 1500
        inet 172.26.249.2  netmask 255.255.255.0  broadcast 172.26.249.255
        ether 02:42:ac:1a:f9:02  txqueuelen 0  (Ethernet)
        RX packets 1656  bytes 557438 (544.3 KiB)
        RX errors 0  dropped 0  overruns 0  frame 0
        TX packets 1566  bytes 5434427 (5.1 MiB)
        TX errors 0  dropped 0 overruns 0  carrier 0  collisions 0

lo: flags=73<UP,LOOPBACK,RUNNING>  mtu 65536
        inet 127.0.0.1  netmask 255.0.0.0
        inet6 ::1  prefixlen 128  scopeid 0x10<host>
        loop  txqueuelen 1000  (Local Loopback)
        RX packets 66  bytes 5300 (5.1 KiB)
        RX errors 0  dropped 0  overruns 0  frame 0
        TX packets 66  bytes 5300 (5.1 KiB)
TX errors 0 dropped 0 overruns 0 carrier 0 collisions 0此时,只有物理网卡 eth0 和 docker0 虚拟网卡,别无其他网卡。
1.2 宿主机 80 端口
先用命令 ss -lntup 或者 netstat -nalpt 验证一下,是否有未知程序占用 80 端口:
docker ps -a   # 实验前,查看是否有启动的容器,如果有暂时先停掉,特别是 nginx 容器
netstat -nalpt # 实验前,先查看宿主机的(80)端口占用情况对于这种模式可能不看这个信息,不过这里也记录一下吧。
【例】
➜  /workspace git:(main) netstat -nalpt
Active Internet connections (servers and established)
Proto Recv-Q Send-Q Local Address           Foreign Address         State       PID/Program name
tcp        0      0 0.0.0.0:36000           0.0.0.0:*               LISTEN      87/sshd: /usr/sbin/
tcp        0      0 127.0.0.11:45371        0.0.0.0:*               LISTEN      -
tcp        0      0 0.0.0.0:8686            0.0.0.0:*               LISTEN      72/node
tcp        0      0 172.26.249.2:8686       172.26.249.1:58336      ESTABLISHED 72/node
tcp 0 0 172.26.249.2:8686 172.26.249.1:58352 ESTABLISHED 231/node会发现这里并没有任何服务占用 80 端口。
2. 启动容器
2.1 bridge 模式启动 nginx_Num1 容器
- docker run 以 bridge 模式,启动第一个 nginx 容器 nginx_Num1
docker images  #查看镜像列表
docker run -d --name nginx_Num1 nginx:alpine #以bridge 桥接模式启动第一个 nginx目的,便于对比,第二个容器以 container 网络模式启动后,网卡的变化。预期结果,其实并没有变化,后面启动的容器,都会使用第一个指定的以桥接方式启动的容器。
【例】
➜  /workspace git:(main) docker run -d --name nginx_Num1 nginx:alpine
Unable to find image 'nginx:alpine' locally
alpine: Pulling from library/nginx
2d35ebdb57d9: Pull complete
8f6a6833e95d: Pull complete
194fa24e147d: Pull complete
3eaba6cd10a3: Pull complete
df413d6ebdc8: Pull complete
d9a55dab5954: Pull complete
ff8a36d5502a: Pull complete
bdabb0d44271: Pull complete
Digest: sha256:b3c656d55d7ad751196f21b7fd2e8d4da9cb430e32f646adcf92441b72f82b14
Status: Downloaded newer image for nginx:alpine
2f079b1b3917a4342f4cc04f8fef76d53c14bfbb3e39618d8a1d8db71d5081ee2.2 查看宿主机端口
netstat -nalpt # 查看宿主机的端口占用情况(主要看 80 端口)【例】
➜  /workspace git:(main) netstat -nalpt
Active Internet connections (servers and established)
Proto Recv-Q Send-Q Local Address           Foreign Address         State       PID/Program name
tcp        0      0 0.0.0.0:36000           0.0.0.0:*               LISTEN      87/sshd: /usr/sbin/
tcp        0      0 127.0.0.11:45371        0.0.0.0:*               LISTEN      -
tcp        0      0 0.0.0.0:8686            0.0.0.0:*               LISTEN      72/node
tcp        0      0 172.26.249.2:8686       172.26.249.1:58336      ESTABLISHED 72/node
tcp 0 0 172.26.249.2:8686 172.26.249.1:58352 ESTABLISHED 231/node2.3 查看宿主机网卡信息
ifconfig【例】
➜  /workspace git:(main) ifconfig
docker0: flags=4163<UP,BROADCAST,RUNNING,MULTICAST>  mtu 1500
        inet 172.17.0.1  netmask 255.255.0.0  broadcast 172.17.255.255
        #...

eth0: flags=4163<UP,BROADCAST,RUNNING,MULTICAST>  mtu 1500
        inet 172.26.249.2  netmask 255.255.255.0  broadcast 172.26.249.255
        #...

lo: flags=73<UP,LOOPBACK,RUNNING>  mtu 65536
        inet 127.0.0.1  netmask 255.0.0.0
        #...

vetha69edf2: flags=4163<UP,BROADCAST,RUNNING,MULTICAST>  mtu 1500
        inet6 fe80::e07a:3eff:febf:56c  prefixlen 64  scopeid 0x20<link>
        ether e2:7a:3e:bf:05:6c  txqueuelen 0  (Ethernet)
        RX packets 0  bytes 0 (0.0 B)
        RX errors 0  dropped 0  overruns 0  frame 0
        TX packets 14  bytes 1252 (1.2 KiB)
TX errors 0 dropped 0 overruns 0 carrier 0 collisions 0可以发现,桥接模式下的容器,会自动创建以 veth 开头的虚拟网卡 。
2.4 查看 nginx_Num1 容器网络信息
docker ps         # 查看正在运行的容器
docker inspect container_id # 根据容器 id 的首字母也可以查看容器详细信息【例】
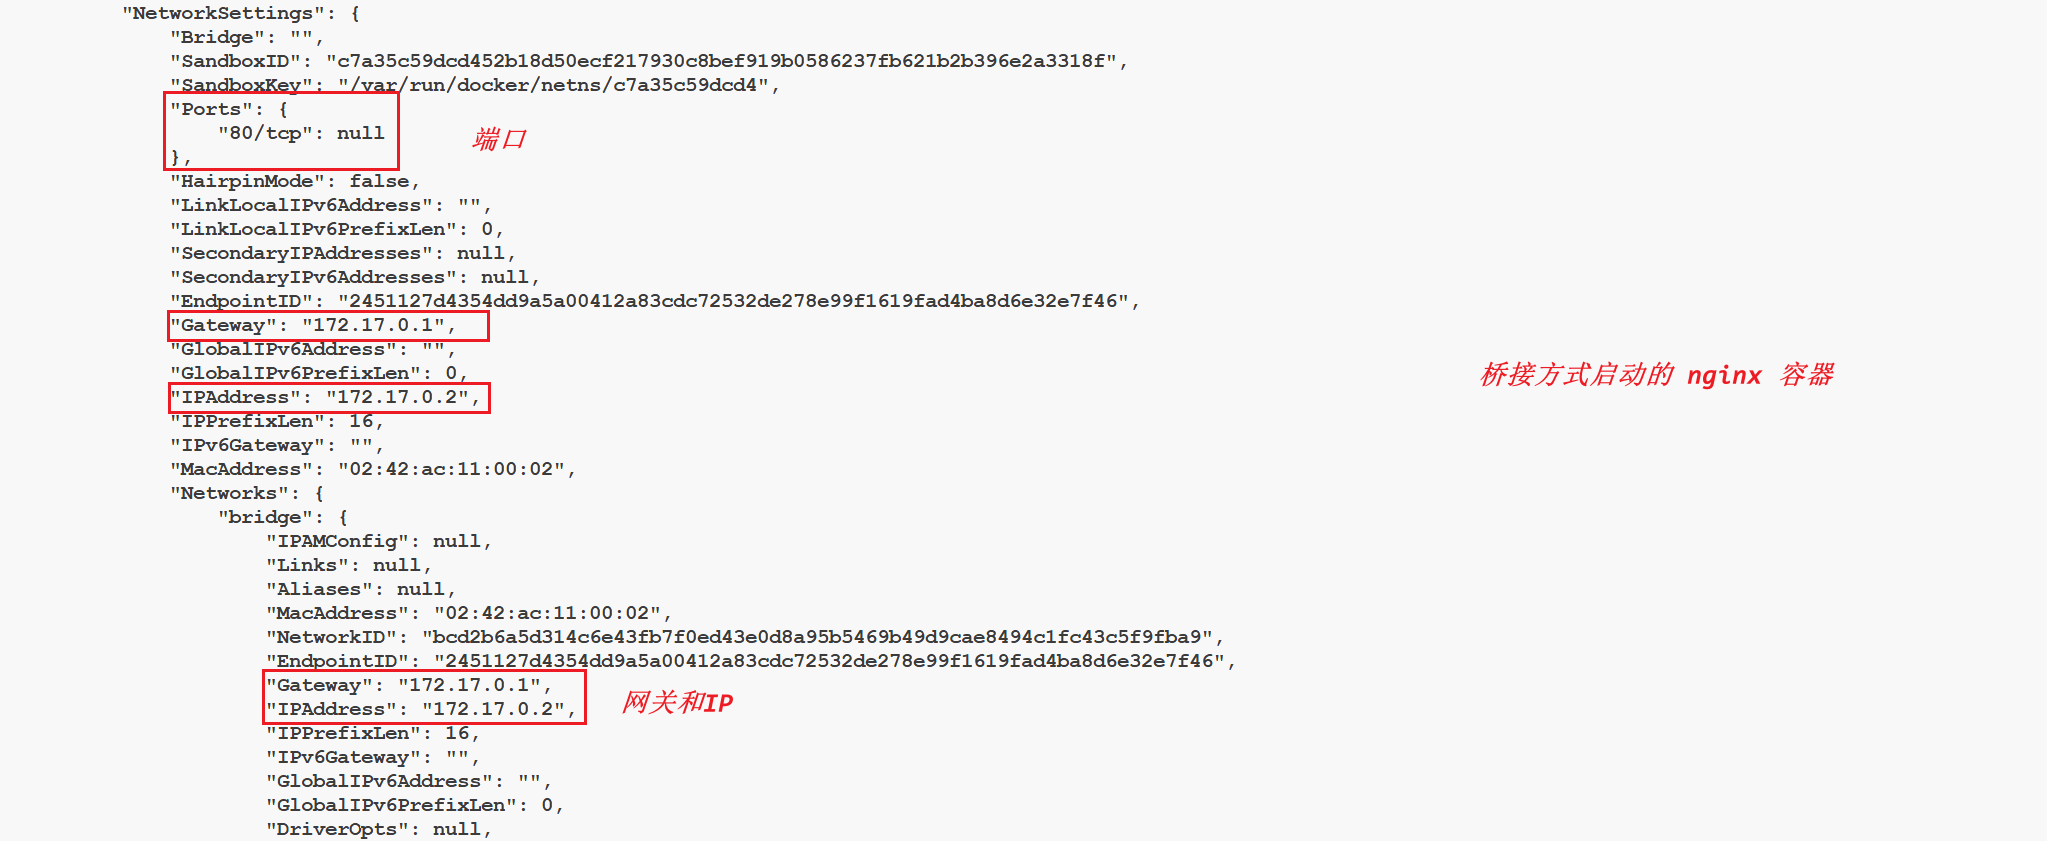
第一个以桥接方式启动的容器的网络信息是全套的,ip 端口 网关,都有。
2.5 container 模式启动 tomcat 容器
docker ps -a  # 查看容器列表(主要是查看刚才的 nginx_启动了没有)
docker run -d --name tomcat_Second --net=container:nginx_Num1 tomcat:8.5.46-jdk8-openjdk # 以 container 模式启动第二个容器,注意,该模式不能使用-p--net = container 后面直接跟冒号,冒号后面是它所依靠的以桥接方式启动的指定容器,即为:--net = container : nginx_Num1 , 其中 nginx_Num1 是上一步以 bridge 方式启动的第一个指定的容器。
注意:container 模式,docker run 的时候,不能使用-p,因为-p 是手动指定端口,而 container 模式的 ip 和端口是不受 container 模式的容器自身控制,它的 IP 和端口,相当于完全委托给第一个以桥接方式启动的容器了。
如果不小心带了-p 8080:8080 这个参数,你将看到这个错误:
shelldocker: Error response from daemon: conflicting options: port publishing and the container type network mode.
【例】
➜  /workspace git:(main) docker run -d --name tomcat_Second  --net=container:nginx_Num1 tomcat:8.5.46-jdk8-openjdk
Unable to find image 'tomcat:8.5.46-jdk8-openjdk' locally
8.5.46-jdk8-openjdk: Pulling from library/tomcat
092586df9206: Pull complete
ef599477fae0: Pull complete
4530c6472b5d: Pull complete
d34d61487075: Pull complete
272f46008219: Pull complete
12ff6ccfe7a6: Pull complete
f26b99e1adb1: Pull complete
21bec9c8ea28: Pull complete
b8a32f28e27c: Pull complete
94fdd0ba0430: Pull complete
Digest: sha256:bb4ceffaf5aa2eba6c3ee0db46d863c8b23b263cb547dec0942e757598fd0c24
Status: Downloaded newer image for tomcat:8.5.46-jdk8-openjdk
f7cb8cb3a2a0054465ecc721cea1b6d60cf589e3032364893574712bf1e2c1222.6 再次查看宿主机网卡信息
ifconfig【例】
➜  /workspace git:(main) ifconfig
docker0: flags=4163<UP,BROADCAST,RUNNING,MULTICAST>  mtu 1500
        inet 172.17.0.1  netmask 255.255.0.0  broadcast 172.17.255.255
        #...

eth0: flags=4163<UP,BROADCAST,RUNNING,MULTICAST>  mtu 1500
        inet 172.26.249.2  netmask 255.255.255.0  broadcast 172.26.249.255
        #...

lo: flags=73<UP,LOOPBACK,RUNNING>  mtu 65536
        inet 127.0.0.1  netmask 255.0.0.0
        #...

vetha69edf2: flags=4163<UP,BROADCAST,RUNNING,MULTICAST>  mtu 1500
        inet6 fe80::e07a:3eff:febf:56c  prefixlen 64  scopeid 0x20<link>
        ether e2:7a:3e:bf:05:6c  txqueuelen 0  (Ethernet)
        RX packets 0  bytes 0 (0.0 B)
        RX errors 0  dropped 0  overruns 0  frame 0
        TX packets 18  bytes 1532 (1.4 KiB)
TX errors 0 dropped 0 overruns 0 carrier 0 collisions 0发现并没有因为又启动一个容器而增加虚拟网卡。
2.7 查看 tomcat_Second 容器网络信息
docker ps         # 查看正在运行的容器
docker inspect container_id # 根据容器 id 的首字母也可以查看容器详细信息【例】

发现,第二个以 container 模式启动容器的网络信息,IP、Mac 地址、网关、端口都是空的
2.8 tomcat_Second 容器能联网吗
我们通过以下命令进入 tomcat_Second 容器:
docker ps
docker exec -it container_id /bin/sh
ping www.baidu.com【例】
➜  /workspace git:(main) docker ps
CONTAINER ID   IMAGE                        COMMAND                  CREATED          STATUS          PORTS     NAMES
f7cb8cb3a2a0   tomcat:8.5.46-jdk8-openjdk   "catalina.sh run"        9 minutes ago    Up 9 minutes              tomcat_Second
2f079b1b3917   nginx:alpine                 "/docker-entrypoint.…"   17 minutes ago   Up 17 minutes   80/tcp    nginx_Num1
➜  /workspace git:(main) docker exec f7cb8cb3a2a0 /bin/sh
➜  /workspace git:(main) docker exec -it f7cb8cb3a2a0 /bin/sh
#
# ping www.baidu.com
PING www.a.shifen.com (183.2.172.17) 56(84) bytes of data.
64 bytes from 183.2.172.17 (183.2.172.17): icmp_seq=1 ttl=48 time=5.14 ms
64 bytes from 183.2.172.17 (183.2.172.17): icmp_seq=2 ttl=48 time=5.20 ms
^C
--- www.a.shifen.com ping statistics ---
2 packets transmitted, 2 received, 0% packet loss, time 1001ms
rtt min/avg/max/mdev = 5.141/5.172/5.203/0.031 ms
#发现是可以联网的。
2.9 访问 nginx_Num1 容器 nginx 服务
我们在宿主机访问一下 nginx_Num1 容器 nginx 服务:
curl 172.17.0.2 #这个地址就是第一个以 bridger 方式启动的 nginx 的 Ip, 它的默认端口是 80【例】
➜  /workspace git:(main) curl 172.17.0.2
#...
<h1>Welcome to nginx!</h1>
#...发现,是可以正常访问的。
2.10 非宿主机其他主机访问
在非宿主机的其他局域网主机访问虚拟内部容器是无法访问的:

这里照搬一张图,因为我是在 CNB 云原生开发中验证,暂时还不知道怎么搞一个同网段的其他主机,这里就没有尝试了。
参考资料:
Docker 四种网络模式(Bridge,Host,Container,None) - wq9 - 博客园
Docker 学习:容器五种(3+2)网络模式 | bridge 模式 | host 模式 | none 模式 | container 模式 | 自定义网络模式详解-CSDN 博客